How can I do a file transfer (download) of a report from the print domain to a file on my PC?
Any report from the mainframe print domain can be transferred into a Word document "doc," text file "txt" (generic text) format, or Excel spreadsheet and be printed using a printer connected to your PC. Following are the instructions for transferring data into a Word document. For detailed instructions on transferring data into an Excel spreadsheet, please see the attachment How To Convert A Mainframe Report To An Excel File.
After transferring your report, please also view the instructions below on How to Print the Document You Transferred.
Immediately below are instructions to transfer your file when using BlueZone 6.1 or BlueZone 7.1 to access JIS. All courts should now be using BlueZone, but if you still have a PC using Host Explorer to access JIS or are still using the older BlueZone 5.1, please skip to the instructions in the attachment Instructions Using Host Explorer or Instructions Using BlueZone 5.1 at the bottom of this answer.
In addition, general information on this topic and briefer instructions are located in the Transfer Reports to PC Text Files section of the Online Manual.
Note: To transfer files, users must have security access to Copy/Print. (See Manage User Access on the Court Management/Manage JIS User IDs page of the Inside Courts Web site.)
How to Transfer a Report Using BlueZone 6.1 or 7.1
1. From the TPX Menu, press <F6> (Session Print) to open your print jobs in your court's print domain.
2. Type TRA (Transfer) in the Command field (at the ? prompt at the top of the screen).
3. Type X next to the report you wish to transfer.
4. Press <ENTER>.
Result: A blank "Ready" screen displays.
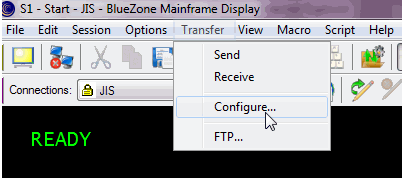
5. From the top Menu bar, click Transfer and select Configure from the drop-down menu, as shown in the image below:
Result: The Host File Transfer window and Host File Configuration (Transfer Setup) windows display, as shown in the image below:
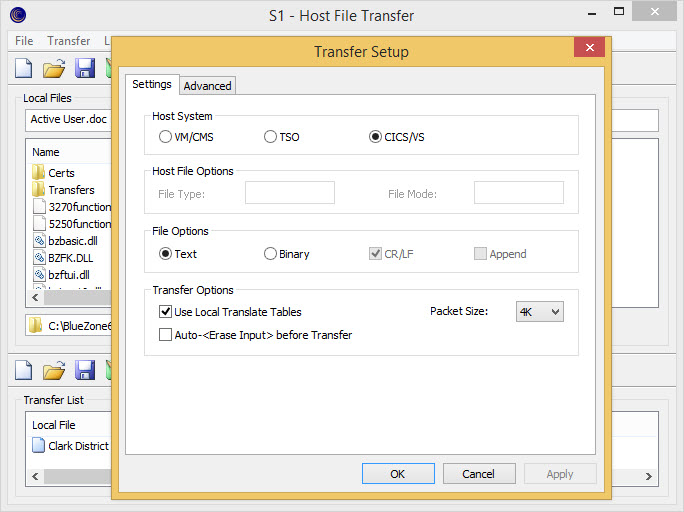
6. In the Host File Configuration (Transfer Setup) window, the Settings tab should already be selected, if it is not, click the Settings tab and make the following entries in each field:
Field | Entry |
| Host System | CICS/VS |
| File Options | Text |
| Transfer Options | Verify ONLY the "Use Local Translate Tables" is checked. |
| Packet Size | 4K |
Click Apply (the Apply button becomes grayed out). DO NOT CLICK OK YET.
Below is a sample of a completed Host File Configuration (Transfer Setup) window from BlueZone 6.1:

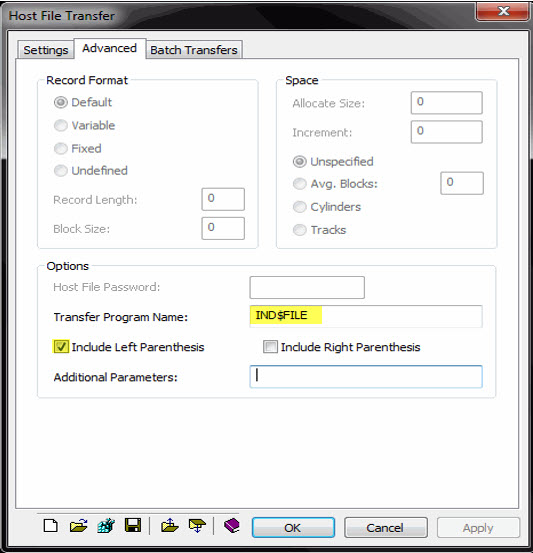
7. While still on the Host File Transfer screen, click the Advanced tab:
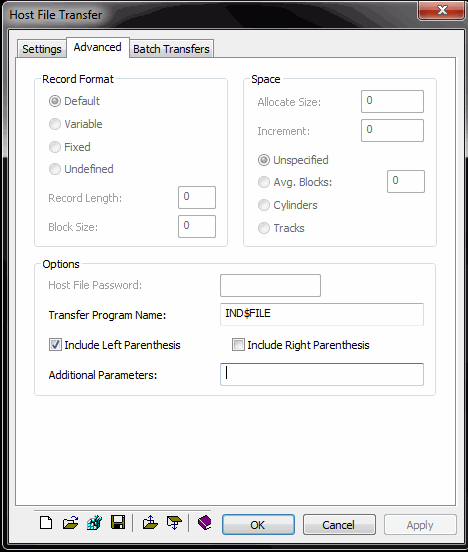
8. Verify the following entries:
- The Transfer Program Name field displays: IND$FILE.
- ONLY the box Include Left Parenthesis is checked.
9. Click Apply, then click OK.
Result: The Host File Configuration (Transfer Setup) window closes and the Host File Transfer window screen remains.
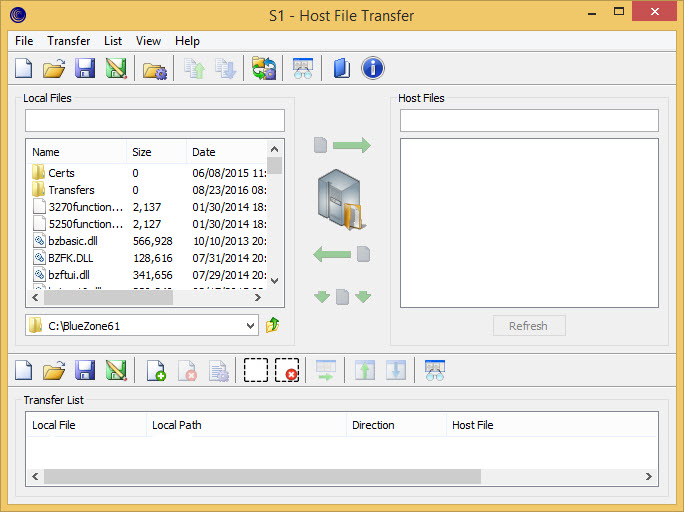
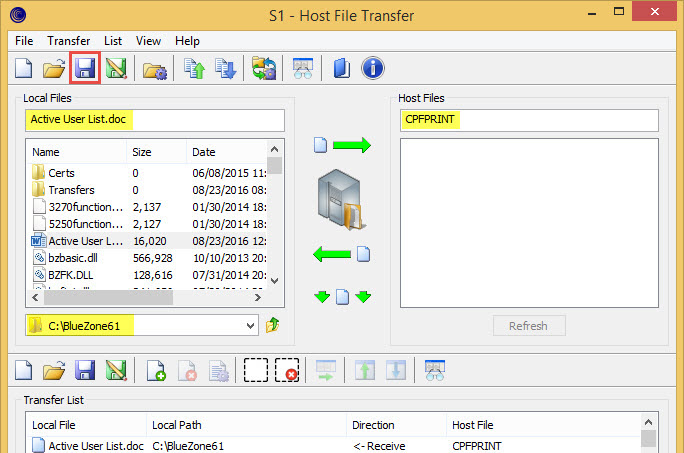
10 . In the Host File Transfer window make the following entries in each field:
| Field | Entry |
| Local Files | Name of document being transferred (include extension, e.g., .doc; .txt ) |
| Local Files - File Location | Review and/or change this location to where you want the document to be saved. NOTE: The system pre-selects the BlueZone6.1 file location on your computer. You can change it to another file location (e.g, Desktop or Local drive file) or you can add a "Transfers" file to the BlueZone6.1 file to use for all of your transferred documents. |
| Host Files | CPFPRINT |
11: Optional - Click the Save icon from the top ribbon of the Host File Transfer window to save the entries made in step 10 for future use.
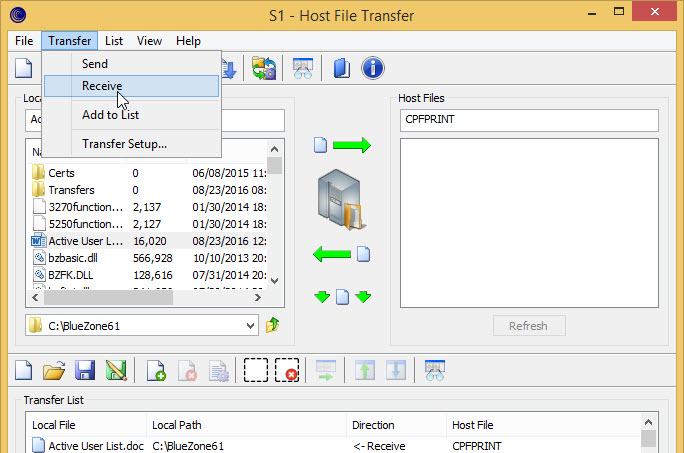
12. On the Menu at the top of the Host File Transfer window, click Transfer and select Receive from the drop-down menu, as shown below:
Result: The Print Menu re-appears. The transfer process is complete and you are now ready to open the transferred document and print it. You may exit the Print Menu.
13. Locate the document name you assigned in Step 10 above.
NOTE: If using Microsoft Word as your word processor, the first time you open a transferred document, you may be prompted to Install a Converter. Click OK to allow the install. (Please see your network administrator or manager if you do not have security settings on your PC to allow this install.)
Please see How to Print the Document You Transferred below for more detailed instructions.
How to Print the document You Transferred:
Step 1: To print the transferred file, open it by double-clicking the file icon from your desktop (or use Windows Explorer to locate the file in the directory you may have indicated in Step 6 above). See below:![]()
Step 2: Depending upon your operating system, the file may automatically open in Microsoft Word or in Notepad, OR you may be asked to select which program to use. If this happens, click the radio button for Select the program from a list and then click OK. See below:![]()
Step 3: In the Open With Dialog box, select either Microsoft Word® or Notepad, and then click OK. See below.
To compare formatting samples between Microsoft Word® and Notepad, you may wish to view the attachments at the bottom of this answer screen. The two attachments are examples of the sample JV Posting Report, one in Microsoft Word and the other in Notepad.![]()
Step 4: Delete any extra page breaks, and format the document as desired (Notepad has limited formatting capabilities). You may wish to change the document page format from portrait to landscape mode.
Step 5: Resave the document after making any formatting changes and BEFORE completing another file transfer.
Note: You cannot use the extension docx or xlsx as they will NOT open after the File Transfer because of corruption.
RN id: 119